Bitmerse Romu Compact USB Development Board (RP2354A)
⚡ The essentials in 60 seconds
- dimensions — 15.5 x 12 mm
- soc — Raspberry Pi RP2354A
- cpu_arm — Dual-core Arm Cortex-M33 @ 150 MHz
- cpu_riscv — Dual-core 32-bit RISC-V Hazard3 @ 150 MHz
- security — Arm Trustzone, Secure boot
- usb_interface — USB 2.0 Type-A (plug-and-play)
- On this board : 9 tutorials · 10 code
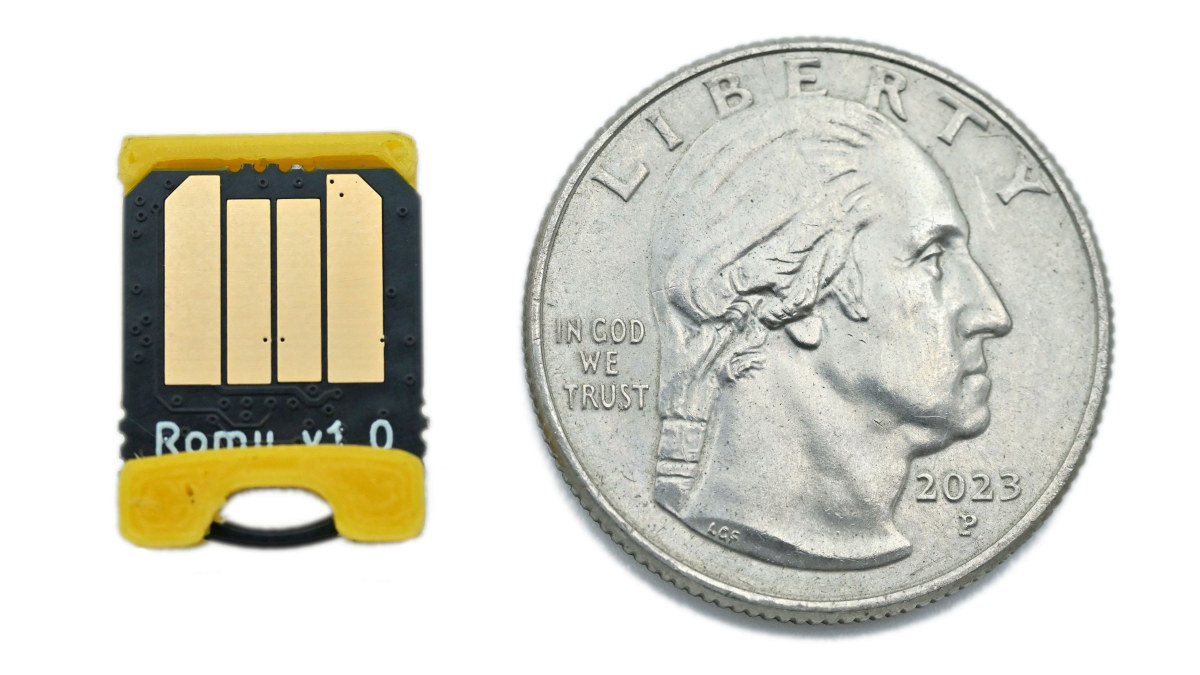
Imagine holding a piece of technology so small that it could easily disappear between your fingers, yet powerful enough to revolutionize how we interact with computers. The Romu board, developed by Bitmerse, is precisely this kind of marvel. Measuring a mere 15.5 by 12 millimeters, it is an ultra-compact development board designed to redefine the boundaries of what is possible in embedded systems. Unlike traditional development boards that often resemble small circuit boards cluttered with pins and connectors, the Romu is engineered with a singular focus: seamless integration into the USB ecosystem. It is not just a component to be wired into a larger project; it is a complete, self-contained peripheral that plugs directly into a computer, eliminating the need for cables, adapters, or complex wiring harnesses. This design philosophy transforms the way developers approach the creation of custom hardware, offering a plug-and-play experience that is both intuitive and incredibly efficient.
At the heart of this tiny device lies the Raspberry Pi RP2354A microcontroller, a chip that represents a significant leap in processing architecture. To understand why this is remarkable, one must look at the concept of hybrid computing. Traditionally, microcontrollers have relied on a single type of processor core, forcing developers to choose between performance, power efficiency, or specific instruction sets. The RP2354A breaks this mold by incorporating a dual architecture. It features two Arm Cortex-M33 cores running at 150 MHz, which are widely recognized for their efficiency and widespread software support. However, it also integrates two RISC-V Hazard3 cores, also running at 150 MHz. This dual-core, dual-architecture setup allows for a level of flexibility previously unseen in such a small form factor. Developers can leverage the mature ecosystem of Arm for certain tasks while utilizing the open-source nature and specific advantages of RISC-V for others. This hybrid approach means that the Romu is not limited to a single programming paradigm or optimization strategy, making it a versatile tool for complex applications that require diverse processing capabilities.
Security is another critical pillar of the Romu’s design, particularly relevant given its intended use cases. In an era where digital identity and data protection are paramount, the board includes advanced security features such as Arm TrustZone and Secure boot. For those unfamiliar with these terms, think of Arm TrustZone as a hardware-enforced isolation mechanism. It allows the processor to create separate, secure environments, ensuring that sensitive operations, such as cryptographic key storage or authentication processes, are kept strictly apart from less secure tasks. Secure boot, on the other hand, ensures that only trusted software can run on the device. When you plug in the Romu, the system verifies the integrity of the code before execution, preventing malicious software from taking control. These features are not merely add-ons; they are fundamental to the board’s role in creating secure hardware tokens and authentication devices. By embedding these security protocols directly into the silicon, Bitmerse has ensured that the Romu can serve as a trusted anchor in a digital world that is increasingly vulnerable to cyber threats.
The physical interface of the Romu is equally innovative. Instead of the standard USB Type-C or Micro-USB ports found on most development boards, this device features a USB 2.0 Type-A connector directly on the PCB. This might seem like a minor detail, but it has profound implications for usability. The Type-A connector is the classic rectangular USB plug that has been the standard for decades. By integrating this directly onto the board, the Romu becomes a true dongle. You simply insert it into any available USB port on a laptop, desktop, or even a compatible hub, and it is instantly recognized as a USB device. There is no need to carry a specific cable, worry about connector orientation, or manage loose wires. This plug-and-play capability makes it ideal for applications where portability and ease of use are critical. Whether you are demonstrating a prototype, using a custom macro pad, or employing a security key, the experience is as simple as inserting a thumb drive.
However, this compact design comes with trade-offs that developers must understand. The Romu does not feature external GPIO (General Purpose Input/Output) headers. In traditional development, GPIO pins allow you to connect sensors, motors, LEDs, and other external components using jumper wires. The absence of these pins on the Romu signals a clear design intent: this is not a general-purpose prototyping board for building robots or IoT sensors that require extensive external wiring. Instead, it is specialized for applications that communicate primarily over USB. To facilitate development and debugging, the board includes small pads for programming and debugging, as well as physical buttons and an RGB LED. The RGB LED serves as a visual feedback mechanism, allowing developers to indicate status, errors, or modes through color changes. The buttons provide basic user input, which, combined with the USB interface, is sufficient for many human-interface device (HID) applications. The debugging pads are essential for more advanced users who need to trace code execution or load firmware, ensuring that despite its simplicity, the board remains a powerful tool for skilled engineers.
The intended use cases for the Romu highlight its specialization. It is perfectly suited for creating USB security keys for passwordless authentication. Because of its small size and secure boot capabilities, it can act as a physical token that proves your identity to a computer without the need for passwords. Similarly, it is an excellent platform for building USB MIDI controllers. Musicians and producers often need custom interfaces to control software synthesizers or digital audio workstations. The Romu’s low latency and direct USB connection make it ideal for translating physical button presses into MIDI signals. Another popular application is the macro pad, a small device with programmable buttons that can execute complex sequences of keystrokes or mouse clicks. For programmers, designers, or gamers, a custom macro pad can significantly enhance productivity. Finally, the board is designed for creating custom HID (Human Interface Device) peripherals. This could range from a specialized keyboard for accessibility needs to a unique controller for a specific software application. The key takeaway is that the Romu is not trying to do everything; it is trying to do specific things exceptionally well, with a focus on USB connectivity and compactness.
It is worth noting that the Romu was introduced through a crowdfunding campaign. This context is important for potential users. Crowdfunding projects often represent cutting-edge technology that is still in the early stages of market adoption. While this means you are getting access to innovative hardware, it also implies that the community and support ecosystem may be smaller compared to established products. However, it also means that early adopters can influence the development roadmap and benefit from a direct line of communication with the creators. The board represents a trend in electronics toward miniaturization and specialization. As microcontrollers become more powerful and integrated, we are seeing a shift away from large, general-purpose boards toward small, task-specific devices. The Romu is at the forefront of this shift, offering a glimpse into a future where hardware is unobtrusive, secure, and seamlessly integrated into our digital workflows.
In summary, the Romu RP2354A USB board is a testament to the power of focused design. By combining a hybrid Arm and RISC-V architecture with robust security features and a direct USB Type-A interface, Bitmerse has created a tool that is both technically sophisticated and practically usable. Its lack of GPIO pins is not a limitation but a clarification of purpose, directing users toward applications that thrive on USB connectivity. Whether you are building a secure authentication token, a custom MIDI controller, or a productivity-enhancing macro pad, the Romu offers a compact, powerful, and secure foundation. It challenges developers to think differently about hardware design, moving away from the clutter of wires and toward the elegance of plug-and-play simplicity. As we continue to integrate technology more deeply into our daily lives, devices like the Romu remind us that sometimes, the smallest packages contain the most significant innovations.
| Attr | Specs | verified |
|---|---|---|
dimensions | 15.5 x 12 mm | ? unverified |
soc | Raspberry Pi RP2354A | ? unverified |
cpu_arm | Dual-core Arm Cortex-M33 @ 150 MHz | ? unverified |
cpu_riscv | Dual-core 32-bit RISC-V Hazard3 @ 150 MHz | ? unverified |
security | Arm Trustzone, Secure boot | ? unverified |
usb_interface | USB 2.0 Type-A (plug-and-play) | ? unverified |
gpio | None (no GPIO headers) | ? unverified |
led | RGB LED | ? unverified |
connectors | Debugging/programming pads, buttons | ? unverified |
use_cases | Security key, USB MIDI controller, macro pad, custom HID | ? unverified |
The Bitmerse Romu board was introduced through a crowdfunding campaign. It is designed as an ultra-compact solution for specific USB application development.
+ Strengths
["- Ultra-compact 15.5 x 12 mm dimensions for easy integration","- Integrated USB 2.0 Type-A connector for cable-free plug-and-play connection","- Hybrid RP2354A microcontroller with Arm Trustzone and Secure boot security"]
− Weaknesses
["- Complete lack of external GPIO pins for general-purpose prototyping","- USB interface limited to USB 2.0 standard","- Programming and debugging require access to soldered pads"]
- Retour d'expérience expert expert — expert-microdb
- Je viens de recevoir ma Romu et le format est bluffant. 15mm pour un RP2354A, c'est une prouesse d'intégration. Pas de GPIO, mais les pads SWD/UART suffisent pour déboguer. J'ai flashé MicroPython sans souci. Parfait pour un dongle HID custom ou FIDO2. Attention, la chauffe est réelle en charge CPU… — expert-microdb
- Salut, merci pour le retour. Petite précision sur la chauffe : avec le dual-core Arm + RISC-V, le TDP est plus élevé qu'un Pico classique. Pour le MIDI, vérifie bien l'impédance, sinon tu auras du bruit. L'absence de broches physiques est rédhibitoire pour le prototypage rapide, mais c'est le prix … — membre-forum
- Retour d'expérience expert expert — expert-microdb
- Après avoir testé la carte Romu de Bitmerse, je confirme son potentiel pour les projets USB ultra-compacts. Avec ses 15,5 x 12 mm et son branchement direct en USB-A, elle est idéale pour des périphériques HID personnalisés ou des clés d'authentification sans mot de passe. Le duo de cœurs Arm Cortex… — expert-microdb
- Merci pour ce retour détaillé. L'architecture hybride du RP2354A est effectivement impressionnante pour une si petite taille. Je me demande comment vous gérez le débogage au quotidien sans accès facile aux GPIO, même avec les pads internes. Est-ce que la campagne Kickstarter d'octobre 2026 a fourni… — membre-forum
- Retour d'expérience expert expert — expert-microdb
- J'ai reçu ma Romu de Bitmerse. Format 15,5x12mm, connecteur USB-A intégré : zéro câble. Le RP2354A est puissant (2x Cortex-M33 + 2x RISC-V @150MHz), mais attention : pas de GPIO. C'est du USB pur (HID, MIDI, dongles). La sécurité TrustZone est un vrai plus. L'absence de broches force à repenser le … — expert-microdb
- Bon retour, mais la limitation sans GPIO me freine. Je voulais l'utiliser pour du hardware hacking avec des entrées/sorties physiques. Si c'est strictement USB, je préfère un Pico classique avec un petit dongle. Le prix de la campagne octobre 2026 va être décisif. Si c'est trop cher pour un usage a… — membre-forum
- Retour d'expérience expert expert — expert-microdb
- Je viens de recevoir ma Romu et le format est bluffant. 15x12mm, c'est minuscule. Le vrai atout, c'est le connecteur USB-A mâle intégré : zéro câble, on branche directement sur le PC. Sous le capot, le RP2354A est solide (Cortex-M33 + RISC-V à 150MHz). Attention toutefois, pas de GPIO externes, seu… — expert-microdb
- Merci pour le retour. J'hésitais justement pour un contrôleur MIDI personnalisé. L'absence de GPIO me semblait rédhibitoire jusqu'à ce que je lise ta confirmation sur les pads de debug. Si on accepte de souder sur ces petits points pour les entrées boutons, ça devient viable. Le fait que ce soit is… — membre-forum
Community feedback and projects
- Discussions Reddit — Carte de développement USB Romu (RP2354A) Bitmerse reddit.com
- Articles CNX Software — Carte de développement USB Romu (RP2354A) Bitmerse cnx-software.com
- Forum officiel — Bitmerse forum.bitmerse.com
Content not available yet.
Content not available yet.
Content not available yet.
["- Not specified"]
- Getting started with the Romu board debutant Guide pas à pas pour la première connexion USB et la vérification du fonctionnement de base de la carte Romu.
- Managing I/O on the Romu board debutant Apprenez à interagir avec les composants intégrés de la carte Romu, car elle ne dispose pas de broches GPIO externes classiques.
- Create a custom HID device with Romu debutant Transformez votre carte Romu en un pavé macro USB compact grâce à ses boutons intégrés et son connecteur Type-A.
- Getting started with the Romu board: first connection and USB detection intermediaire Apprenez à brancher et détecter votre carte Romu pour la première fois, sans soudure ni câble externe.
- Managing I/O on the Romu board intermediaire Apprenez à utiliser les pads de débogage et la LED RGB pour interagir avec les entrées-sorties sur la carte Romu.
- Create a Custom HID Device with Romu intermediaire Transformez la carte Romu en un périphérique d'entrée USB dédié pour automatiser des tâches complexes.
- Advanced setup of the Romu board avance Guide avancé pour initialiser la carte Romu via son connecteur USB intégré et configurer l'environnement de développement.
- Advanced I/O Management on Romu: Debug Pads and Internal Peripherals avance Apprenez à exploiter les pads de débug et les composants internes de la carte Romu pour créer des interfaces homme-machine personnalisées sans GPIO externes.
- Build a USB HID Macro Pad with the Romu Board avance Transformez la carte Romu en un périphérique d'entrée personnalisé pour automatiser des tâches complexes via des macros.
Code library — examples written for this board
romu-rgb-led-pwm.inoC/C++ (Pico SDK)romu-hid-keyboard-macro.inoC/C++ (TinyUSB)romu-internal-flash-storage.inoC/C++ (Pico SDK)romu-midi-controller.inoC/C++ (TinyUSB)romu-secure-boot-check.inoC/C++ (Pico SDK)romu-hid-custom-keyboard.inoC++ (Arduino)romu-usb-flash-storage.inoC++ (Arduino)romu-rgb-led-pwm.inoC++ (Arduino)romu-secure-boot-check.inoC++ (Pico SDK)romu-usb-cdc-logging.pyPython (MicroPython)