Arduino Micro
⚡ The essentials in 60 seconds
- mcu — Atmel (now Microchip) ATmega32U4, 8-bit AVR RISC, 16 MHz crystal oscillator on the board (board page; micro.build.f_cpu=16000000L in boards.txt). Datasheet: "Low Power AVR 8-Bit Microcontroller", 32 KB In-System Self-Programmable Flash, 2.5 KB SRAM, 1 KB EEPROM, 26 general-purpose I/O lines, 44-pin QFN/TQFP package, 16 MHz at 4.5 V (industrial range), operating temperature −40 °C to +85 °C.
- gpu_storage — none — bare MCU board, no graphics or filesystem.
- usb — micro-USB connector; the 32U4 integrates the USB 2.0 Full-speed/Low-speed device controller (datasheet feature list), enumerating as a virtual CDC COM port plus generic keyboard and mouse HID (store page — Communication). USB IDs from boards.txt: VID 0x2341 with PID 0x0037 (COM) / 0x8037 (bootloader), Genuino VID 0x2A03 (same PIDs), plus 0x0237/0x8237.
- i_o_20_digital_pins_5_v_logic — - 7 PWM (8-bit via analogWrite): 3, 5, 6, 9, 10, 11, 13. - 12 analog inputs, 10-bit ADC: A0–A5 labelled on the board, plus A6–A11 shared with digital pins 4, 6, 8, 9, 10, 12; AREF pin for external reference. - UART TTL (5 V) on 0 (RX) / 1 (TX) via the Serial1 class; Serial = USB CDC. - I²C/TWI on 2 (SDA) / 3 (SCL) via Wire. - SPI only on the ICSP header (and nearby MISO/MOSI/SCK test points) — not on the digital header as on the Uno. - External interrupts on 0, 1, 2, 3, 7. - RX_LED/SS — extra pin vs Leonardo: RX activity LED, reusable as SPI slave-select. - LED_BUILTIN on pin 13; RX/TX LEDs show USB (not pin 0/1) traffic.
- drive — 20 mA recommended / 40 mA absolute max per pin; internal pull-ups 20–50 kΩ (store page — Input and Output).
- power — micro-USB or external supply on Vin/GND pins (no barrel jack), auto-selected; operating 7–20 V, recommended 7–12 V (regulator may overheat above 12 V); pins VIN, 5V, 3V3 limited to 50 mA, GND, AREF, Reset; resettable 500 mA polyfuse protects the host USB port (store page — Power/Warnings).
- On this board : 9 tutorials · 10 code
The Arduino Micro stands out in the world of electronics development boards not merely for its compact size, but for its unique architectural approach to how it communicates with the outside world. Introduced in 2012 and developed in conjunction with Adafruit, this board represents a significant shift in design philosophy compared to its larger siblings like the Arduino Uno. At its heart lies the Atmel ATmega32U4, an 8-bit AVR microcontroller that runs at a clock speed of 16 MHz. To understand what this means in practical terms, think of the clock speed as the heartbeat of the chip; at 16 million cycles per second, it can execute instructions rapidly enough for most real-time control tasks, such as reading sensors or controlling motors, though it lacks the raw processing power of modern 32-bit processors. The Micro is a "bare-metal" board, meaning it does not run an operating system like Windows or Linux. Instead, it executes code directly on the hardware, which makes it incredibly efficient and responsive, ideal for applications where every microsecond counts.
One of the most defining features of the Arduino Micro is its native USB capability. Unlike older Arduino boards that require a separate chip to handle USB communication, the ATmega32U4 integrates the USB controller directly into the main processor. This integration allows the Micro to appear to your computer not just as a serial port for programming, but as a fully functional USB Human Interface Device (HID). In simpler terms, you can program the Micro to act as a keyboard or a mouse. This opens up creative possibilities, such as building custom macro pads, automating software tasks, or creating interactive installations that respond to physical inputs by typing text or moving the cursor. However, this power comes with a cautionary note: because the Micro can take over your keyboard and mouse, it is crucial to include a physical failsafe button in your code. This ensures that if a program goes wrong, you can still regain control of your computer by pressing a button that stops the Micro from sending keystrokes.
Physically, the Arduino Micro is designed with the hobbyist and prototyper in mind. Its printed circuit board measures just 48 by 17.7 millimeters, making it small enough to straddle the center channel of a standard breadboard. This form factor allows you to plug the board directly into a breadboard without taking up valuable space, facilitating quick and easy circuit assembly. The board is lightweight, weighing around 20 grams with headers attached, and is often referred to as "breadboard-friendly." This compactness has made it a popular choice for wearable electronics, small robots, and other projects where space is at a premium. The board is currently active and available for purchase, with a price point of approximately €24.10, though it is also sold in a variant without pre-soldered headers for those who prefer to solder their own connections.
When it comes to connectivity and input/output capabilities, the Micro offers a robust set of options, though with some important distinctions from other Arduino boards. It provides 20 digital pins, seven of which support Pulse Width Modulation (PWM). PWM is a technique that allows the board to simulate analog output by rapidly switching a digital pin on and off, which is useful for controlling the brightness of LEDs or the speed of motors. Additionally, the Micro features 12 analog input channels, which is double the number found on the Arduino Uno. These analog pins allow the board to read continuous signals from sensors, such as light sensors or potentiometers, with a resolution of 10 bits. This means it can distinguish between 1,024 different voltage levels, providing a good balance between precision and speed for most sensor applications.
However, users transitioning from the Arduino Uno should be aware of a critical difference in how serial communication is handled. On the Uno, the primary serial port (Serial) is connected to pins 0 and 1. On the Micro, because the USB connection is native, the primary serial port (Serial) is the USB connection itself. The hardware serial port on pins 0 and 1 is labeled as Serial1. This means that if you are following a tutorial written for the Uno and use the command Serial.print, your message will appear in the Arduino IDE’s Serial Monitor via USB, but not on pins 0 and 1. To communicate with devices like GPS modules or Bluetooth adapters connected to pins 0 and 1, you must explicitly use Serial1. This "two serial worlds" concept is a common source of confusion for beginners and is a key learning point for anyone working with the Micro.
Powering the Arduino Micro is flexible but requires attention to detail. The board can be powered via the micro-USB connector or through an external power supply connected to the Vin and GND pins. It is important to note that the Micro does not have a barrel jack for power, so external power must be wired directly to the pins. The recommended input voltage range is 7 to 12 volts; supplying voltages higher than 12 volts can cause the onboard voltage regulator to overheat. The board also provides a 3.3-volt pin, but it is limited to 50 milliamps, which is sufficient for small sensors but not for powering high-current devices like Wi-Fi modules or large displays. A resettable polyfuse protects the host USB port from overcurrent, ensuring that if you accidentally short-circuit the board, it will not damage your computer.
Programming the Arduino Micro is done using the standard Arduino IDE or command-line tools. The board uses a bootloader called Caterina, which allows you to upload new code via USB without needing a separate programmer. To upload code, the IDE automatically resets the board by opening the virtual COM port at 1200 baud, a specific data rate that signals the bootloader to enter programming mode. This process is seamless for most users, but it can sometimes be finicky. If the automatic reset fails, you may need to manually press the reset button on the board just before uploading. The bootloader remains active for about eight seconds, giving you a brief window to upload your sketch. Once the upload is complete, the board jumps directly to your code.
Despite its strengths, the Arduino Micro has some limitations and known issues. One significant drawback is that the SPI (Serial Peripheral Interface) pins are not available on the main digital header. Instead, they are only accessible via the ICSP header, a small 6-pin connector. This means that many standard Arduino shields, which rely on SPI pins being on the main header, will not work with the Micro unless they have a specific pass-through for the ICSP header. Additionally, there is a known bug in the USB communication stack where the Serial.available function may not correctly report the number of bytes received if multiple single bytes are sent rapidly. This is a long-standing issue that affects all boards using the ATmega32U4 chip. Furthermore, on Windows operating systems, you may need to manually install a driver file (.inf) to ensure the board is recognized correctly as a COM port.
In summary, the Arduino Micro is a versatile and compact development board that excels in projects requiring native USB HID capabilities or a small footprint. Its ability to act as a keyboard or mouse, combined with its breadboard-friendly design, makes it a favorite among makers and educators. While it requires some adjustment for those used to the Arduino Uno, particularly regarding serial communication and SPI pin placement, its unique features offer distinct advantages for specific applications. Whether you are building a custom input device, a small robot, or a sensor node, the Arduino Micro provides a powerful and flexible platform for bringing your ideas to life.
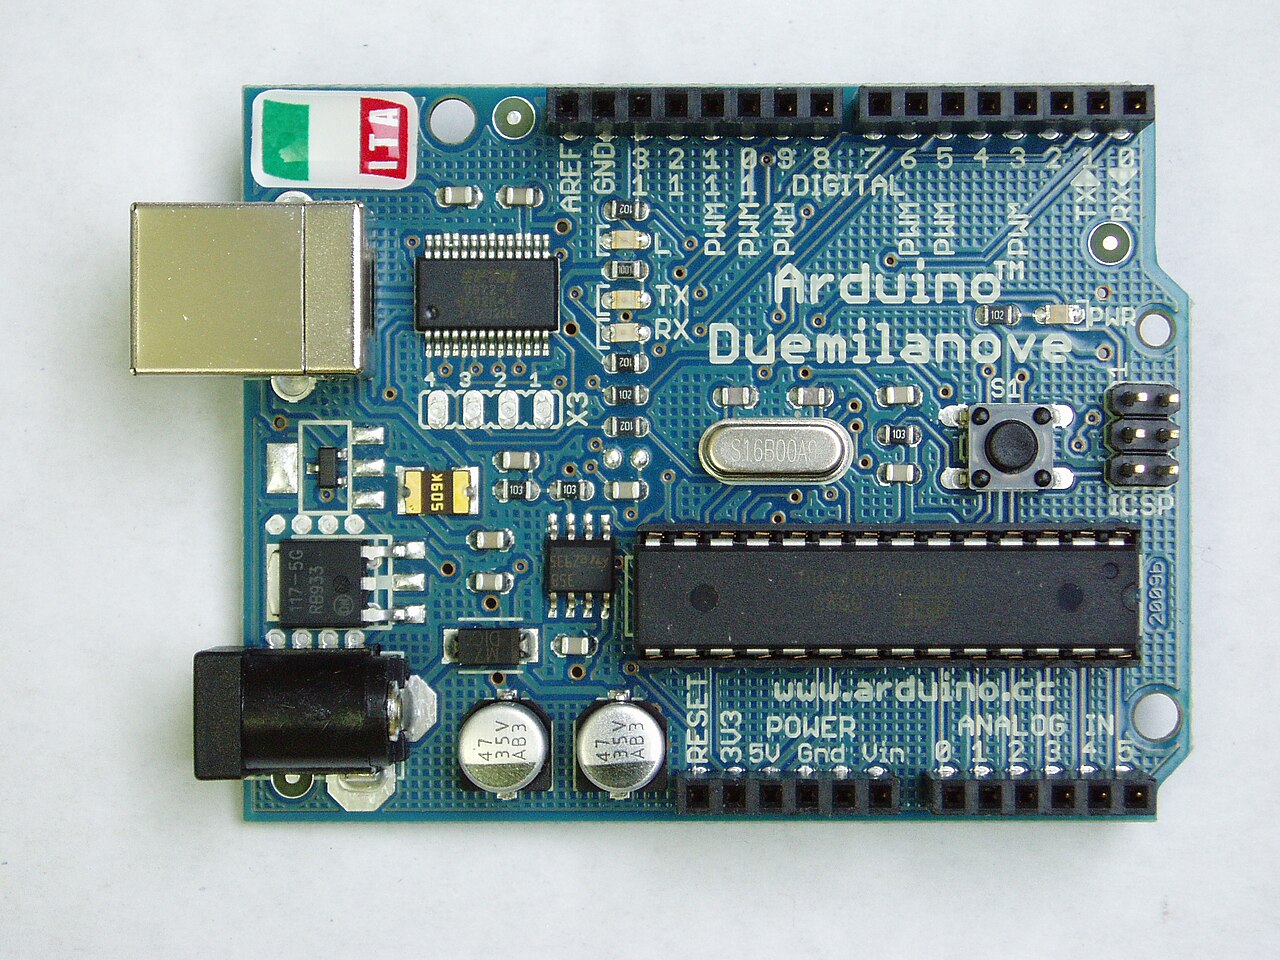
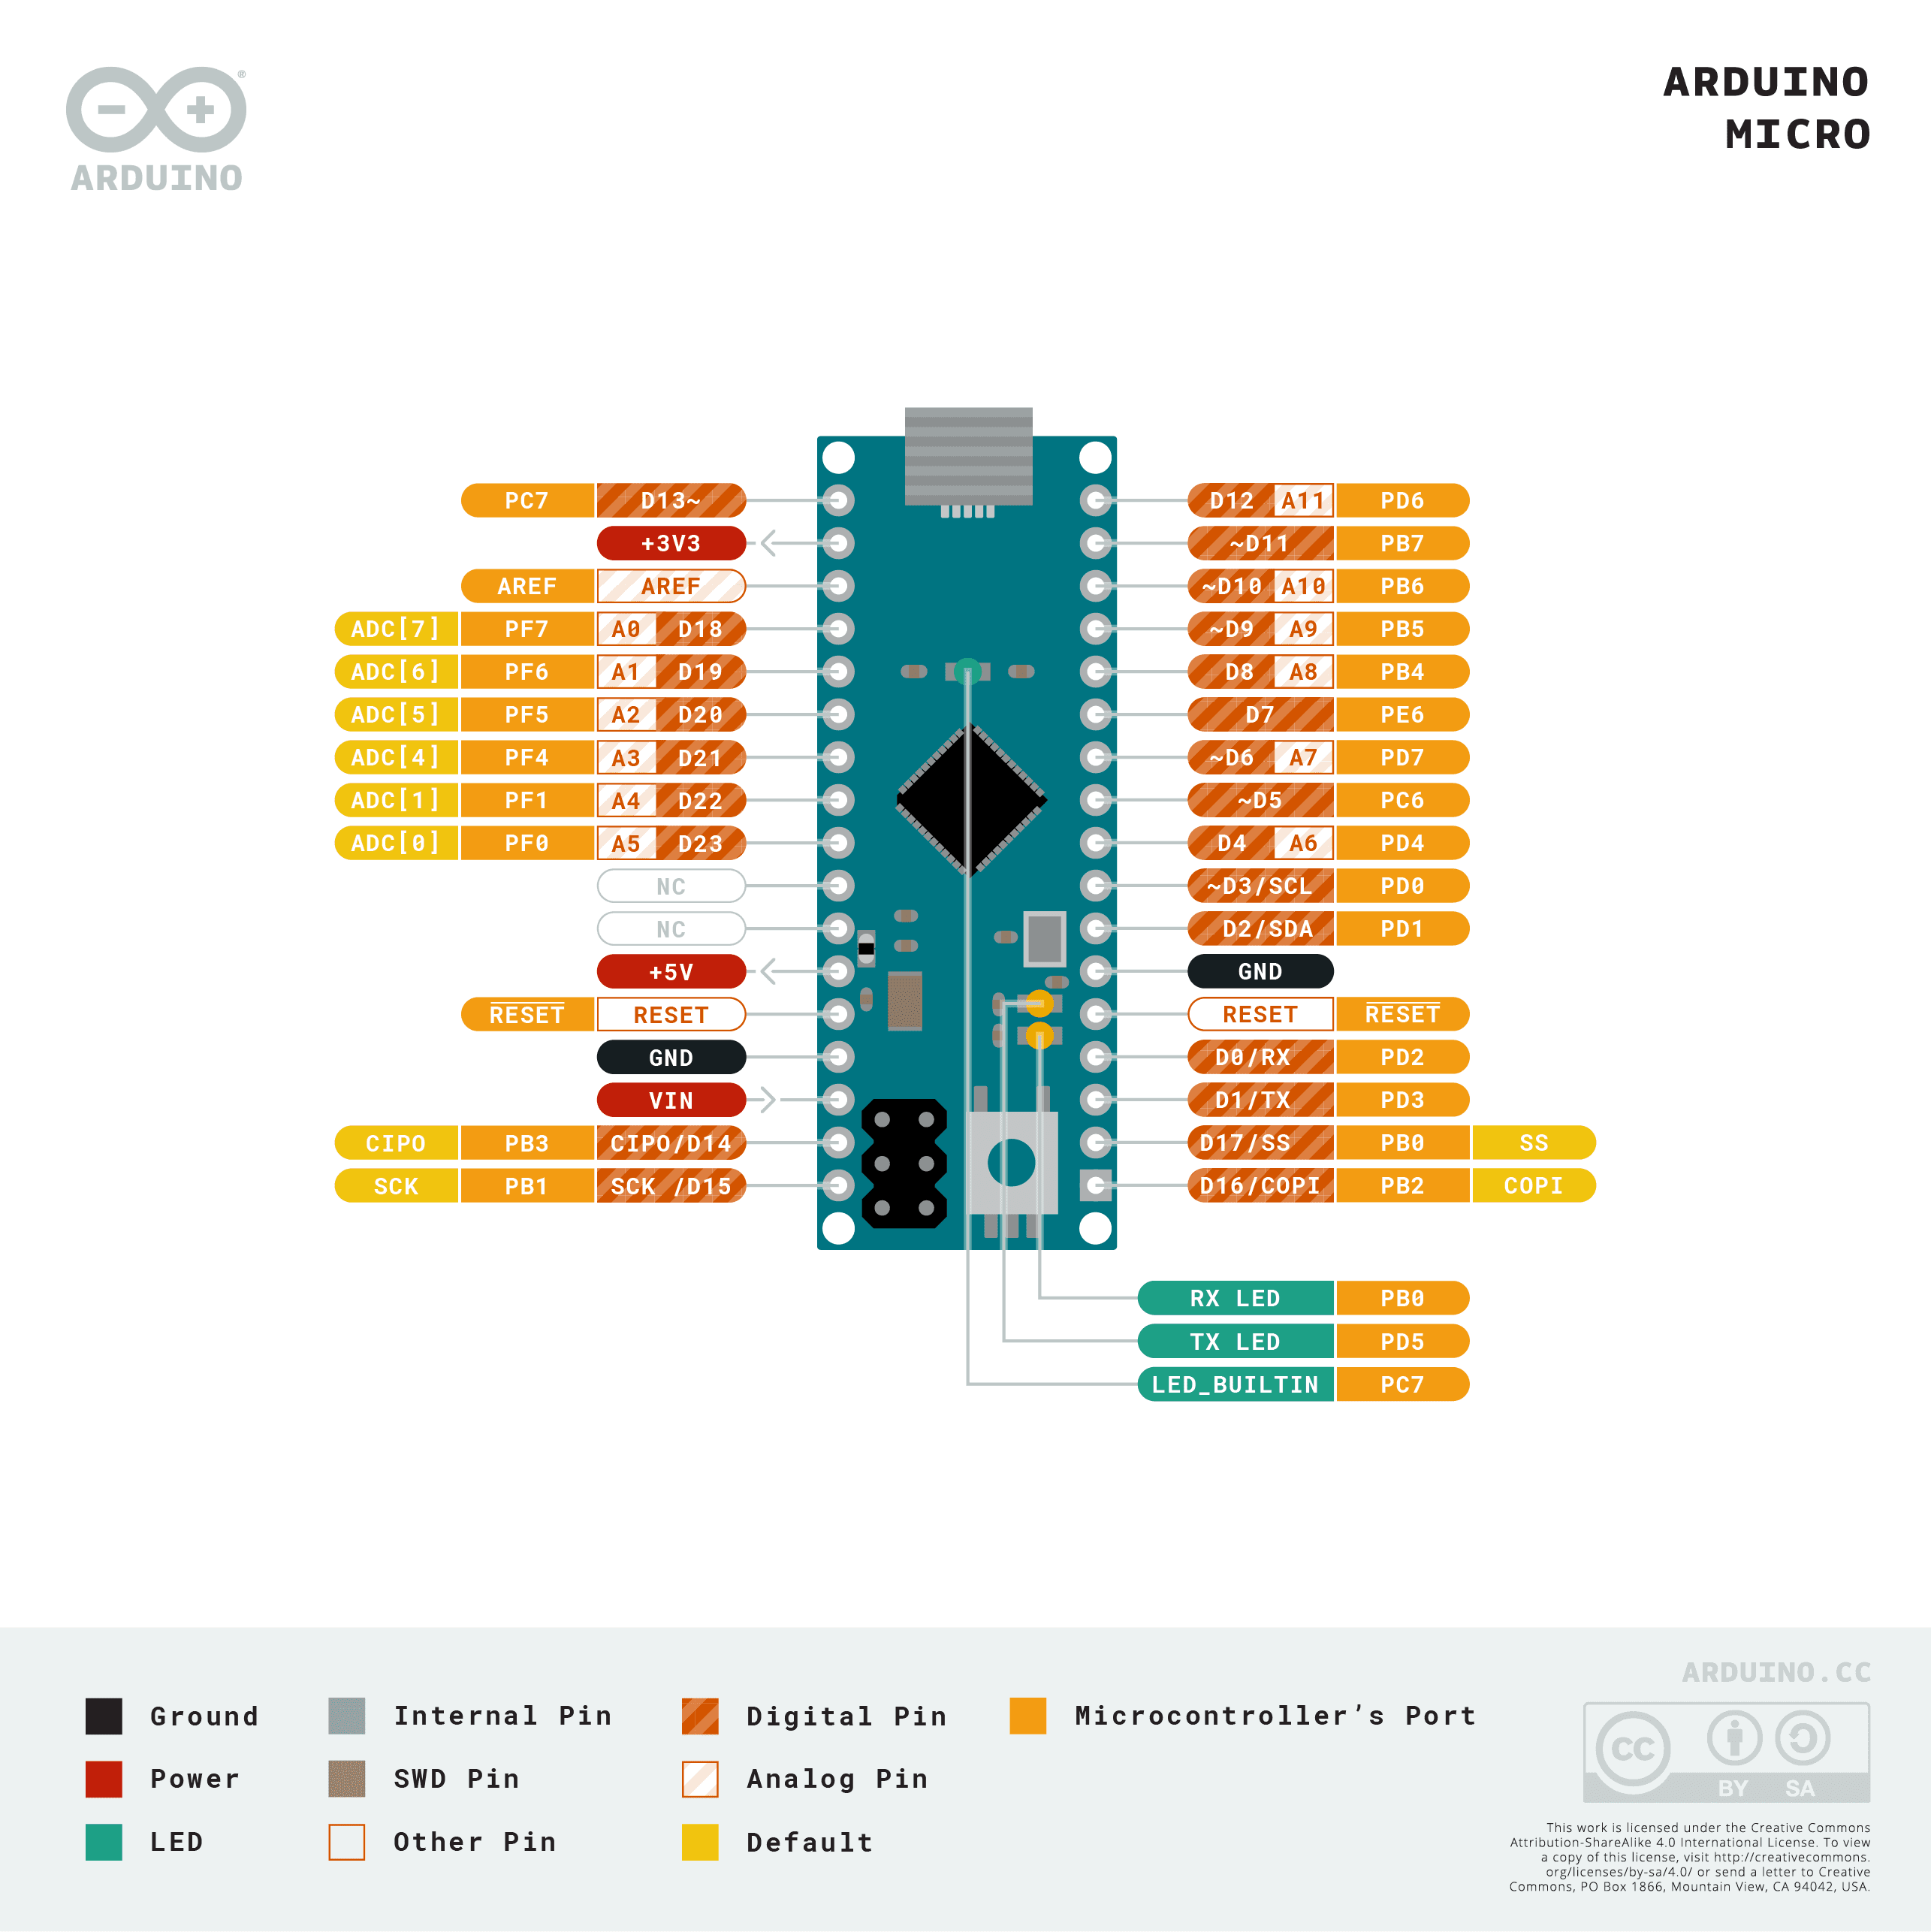
Pinout diagram
| Attr | Specs | verified |
|---|---|---|
mcu | Atmel (now Microchip) ATmega32U4, 8-bit AVR RISC, 16 MHz crystal oscillator on the board (board page; micro.build.f_cpu=16000000L in boards.txt). Datasheet: "Low Power AVR 8-Bit Microcontroller", 32 KB In-System Self-Programmable Flash, 2.5 KB SRAM, 1 KB EEPROM, 26 general-purpose I/O lines, 44-pin QFN/TQFP package, 16 MHz at 4.5 V (industrial range), operating temperature −40 °C to +85 °C. | ✔ |
gpu_storage | none — bare MCU board, no graphics or filesystem. | ? unverified |
usb | micro-USB connector; the 32U4 integrates the USB 2.0 Full-speed/Low-speed device controller (datasheet feature list), enumerating as a virtual CDC COM port plus generic keyboard and mouse HID (store page — Communication). USB IDs from boards.txt: VID 0x2341 with PID 0x0037 (COM) / 0x8037 (bootloader), Genuino VID 0x2A03 (same PIDs), plus 0x0237/0x8237. | ✔ |
i_o_20_digital_pins_5_v_logic | - 7 PWM (8-bit via analogWrite): 3, 5, 6, 9, 10, 11, 13. - 12 analog inputs, 10-bit ADC: A0–A5 labelled on the board, plus A6–A11 shared with digital pins 4, 6, 8, 9, 10, 12; AREF pin for external reference. - UART TTL (5 V) on 0 (RX) / 1 (TX) via the Serial1 class; Serial = USB CDC. - I²C/TWI on 2 (SDA) / 3 (SCL) via Wire. - SPI only on the ICSP header (and nearby MISO/MOSI/SCK test points) — not on the digital header as on the Uno. - External interrupts on 0, 1, 2, 3, 7. - RX_LED/SS — extra pin vs Leonardo: RX activity LED, reusable as SPI slave-select. - LED_BUILTIN on pin 13; RX/TX LEDs show USB (not pin 0/1) traffic. | ? unverified |
drive | 20 mA recommended / 40 mA absolute max per pin; internal pull-ups 20–50 kΩ (store page — Input and Output). | ✔ |
power | micro-USB or external supply on Vin/GND pins (no barrel jack), auto-selected; operating 7–20 V, recommended 7–12 V (regulator may overheat above 12 V); pins VIN, 5V, 3V3 limited to 50 mA, GND, AREF, Reset; resettable 500 mA polyfuse protects the host USB port (store page — Power/Warnings). | ✔ |
size_weight | PCB 48 × 17.7 mm (USB connector extends beyond), breadboard-friendly; 20 g with headers, 16 g without (store page — Physical Characteristics; store product JSONs). | ✔ |
- Manufacturer: Arduino (arduino.cc), developed in conjunction with Adafruit (board page); the PCB carries "Adafruit co-design" text on the back (store product image alt-text).
- Year: Introduced in 2012 — the board definition and its Caterina bootloader were merged into the official AVR core on 27 October 2012 (commit "Adding Micro.") with a firmware update on 2 November 2012 (ArduinoCore-avr commit history for bootloaders/caterina/Caterina-Micro.hex).
- Status: Active — currently listed and stocked on the official store (product JSON fetched live, updated_at 2026-10-13) (store page).
- Price: Current store price €24.10 (SKU A000053, EUR, taxable) (store product JSON).
- Variants: - Arduino Micro without headers — same board, unpopulated pins, €25.40, SKU A000093 (store product JSON). - Genuino Micro — sold under the Genuino brand outside the US during 2015–2016 (Wikipedia — Arduino); Genuino USB vendor ID 0x2A03 is still in the core's board definition (boards.txt). - The breadboard-sized 32U4 design spawned the ubiquitous third-party "Pro Micro" clones (Wikipedia — Arduino, image "Arduino Pro Micro (ATmega32U4)").
+ Strengths
- Native USB, no co-processor: like the Leonardo, the 32U4 is the USB device, so the board can appear as a mouse and keyboard plus virtual COM port (board page, store page) — programmable via the built-in Keyboard and Mouse classes.
- Breadboard form factor: 48 × 17.7 mm PCB straddles a breadboard's centre channel, the smallest official AVR board of its generation (board page).
- Co-designed with Adafruit — the collaboration that later fed the Pro Micro ecosystem (board page).
- 12 analog channels (vs 6 on the Uno) by multiplexing A6–A11 onto digital pins 4/6/8/9/10/12 (store page).
- RX_LED/SS dual-purpose pin — an extra pin compared to the Leonardo (store page — Input and Output).
- USB overcurrent protection: resettable polyfuse breaks USB above 500 mA (store page — Warnings).
- Open-source hardware — Arduino publishes the board's design files via the docs page (board page).
− Weaknesses
- Two serial worlds: Serial = USB/CDC, Serial1 = TTL on pins 0/1 — Uno-oriented sketches and tutorials silently talk to the wrong port (store page — Input and Output).
- CDC RX bug: Serial.available only returns 0 or 1 when multiple single bytes are sent to the ATmega32U4 USB port — long-standing open issue #267 (affects all 32U4 boards, Micro included).
- Caterina bootloader quirks: it "executes SPM operations with interrupts enabled" (issue #122) and can leave an interrupt enabled after exit (issue #218).
- Reset/upload dance: the virtual COM port disappears during reset and the bootloader window is only ~8 s; if the IDE can't trigger the 1200-baud reset you must press reset manually (store page — Automatic Reset).
- Keyboard hijack risk: HID sketches take over the host keyboard/mouse — the official KeyboardMessage pattern advises keeping a physical failsafe button (store page — Communication for the classes; KeyboardMessage example for the pattern).
- SPI shields may not work: SPI is only on the 6-pin ICSP header, not the digital header, so shields without ICSP pass-through are dead ends (store page — Input and Output).
- No barrel jack / no 5V-tolerant Vin headroom: external power must be wired to Vin/GND; >12 V risks regulator overheating, and the 3.3 V pin supplies only 50 mA (store page — Power).
- Fixed USB identity: renaming the USB device required reflashing descriptors (issue #295, closed); richer HID descriptor support is still an open pull request (PR #387).
- Windows needs a .inf for the CDC port (store page — Communication).
- Retour d'expérience expert expert — expert-arduino
- Retour d'experience sur l'Arduino Micro. Le format 48x17.7mm est vraiment pratique pour les breadboards, on gagne de la place par rapport a l'Uno. La presence du 32U4 permet d'être reconnu comme clavier/souris, c'est top pour les macros. Par contre, attention aux pieges documentes. D'abord, le dual… — expert-arduino
- Merci pour le rappel sur le SPI, j'ai perdu une heure a comprendre pourquoi mon module ne repondait pas. Concernant le bug CDC, est-ce que ca affecte aussi la vitesse de chargement ? J'ai souvent des erreurs de port série au moment du upload. Il faut vraiment appuyer sur le bouton reset a la second… — maker-hobbyiste
- Pour repondre a ta question sur le upload, oui, la dance du reset est obligatoire si l'auto-reset échoue. Le port COM disparait au moment du reset, donc il faut être rapide pour reselectionner le port dans l'IDE une fois le bootloader actif. Un autre point delicat : si tu joues avec les classes Key… — dev-embarque
Community feedback and projects
- 2 programs in 1 on a Arduino micro ! forum.arduino.cc
- Can I get my Arduino Micro to be JUST an HID joystick, nothing else? forum.arduino.cc
- Arduino Micro - Sketch doesn't upload and bricks arduino forum.arduino.cc
- Sending values to a 12 bit DAC via Arduino Micro forum.arduino.cc
- Arduino Micro - Belegung für Simracing Wheel forum.arduino.cc
Content not available yet.
- docs.arduino.cc/hardware/micro/
- with headers
- without headers
- product JSON API
- Atmel/Microchip ATmega16U4/32U4 datasheet (PDF)
- docs.arduino.cc/retired/getting-started-guides/ArduinoLeonardoMicro
- arduino/ArduinoCore-avr
- boards.txt
- bootloaders/caterina
- arduino/arduino-cli
- Arduino forum
- Project Hub
- Wikipedia — Arduino
- Two serial worlds: Serial = USB/CDC, Serial1 = TTL on pins 0/1 — Uno-oriented sketches and tutorials silently talk to the wrong port (store page — Input and Output).
- CDC RX bug: Serial.available only returns 0 or 1 when multiple single bytes are sent to the ATmega32U4 USB port — long-standing open issue #267 (affects all 32U4 boards, Micro included).
- Caterina bootloader quirks: it "executes SPM operations with interrupts enabled" (issue #122) and can leave an interrupt enabled after exit (issue #218).
- Reset/upload dance: the virtual COM port disappears during reset and the bootloader window is only ~8 s; if the IDE can't trigger the 1200-baud reset you must press reset manually (store page — Automatic Reset).
- Keyboard hijack risk: HID sketches take over the host keyboard/mouse — the official KeyboardMessage pattern advises keeping a physical failsafe button (store page — Communication for the classes; KeyboardMessage example for the pattern).
- SPI shields may not work: SPI is only on the 6-pin ICSP header, not the digital header, so shields without ICSP pass-through are dead ends (store page — Input and Output).
- No barrel jack / no 5V-tolerant Vin headroom: external power must be wired to Vin/GND; >12 V risks regulator overheating, and the 3.3 V pin supplies only 50 mA (store page — Power).
- Fixed USB identity: renaming the USB device required reflashing descriptors (issue #295, closed); richer HID descriptor support is still an open pull request (PR #387).
- Windows needs a .inf for the CDC port (store page — Communication).
- Faire clignoter la LED embarquée (et comprendre les LED TX/RX) debutant Schéma : IMG-micro-debutant-1-micro-clignotement-led.svg — Vue de dessus d'une Arduino Micro avec la LED de la broche 13 (LED_BUILTIN) mise en évidence et les LED TX/RX près du connecteur micro-USB
- Lire un bouton avec une résistance de pull-up interne debutant Schéma : IMG-micro-debutant-2-micro-bouton-pull-up.svg — Bouton à connexion branché entre la broche 2 et GND sur une Arduino Micro, avec la résistance de pull-up interne symbolisée sur l'entrée
- Lire un capteur analogique sur le convertisseur 10 bits debutant Schéma : IMG-micro-debutant-3-micro-capteur-analogique.svg — Potentiomètre monté en diviseur de tension sur A0 d'une Arduino Micro, curseur vers A0, extrémités vers 5V et GND, LED avec résistance sur la broche PWM 9
- Transformer le Micro en clavier USB (HID) avec bouton de sécurité intermediaire Schéma : IMG-micro-intermediaire-1-micro-hid-clavier.svg — Arduino Micro branchée en USB à un ordinateur, vue comme périphérique clavier, avec un bouton de sécurité sur la broche 2 vers GND et un éditeur de texte ouvert à l'écran
- Pont Serial vers Serial1 : passerelle USB vers TTL intermediaire Schéma : IMG-micro-intermediaire-2-micro-pont-serial-serial1.svg — Arduino Micro en passerelle série : le port USB (Serial, CDC) relié logiquement à l'UART TTL des broches 0 (RX) et 1 (TX) vers un module externe, avec des flèches dans les deux sens
- Piloter un servo moteur avec le PWM et un potentiomètre intermediaire Schéma : IMG-micro-intermediaire-3-micro-pwm-servo.svg — Servomoteur alimenté par une source externe 5V reliée à GND commun, signal sur la broche 9 d'une Arduino Micro, potentiomètre sur A0, alimentation Vin 7-12V conseillée
- Sortir des sentiers : registres AVR et interruption externe avance Schéma : IMG-micro-avance-1-micro-registres-avr-interruption.svg — Bouton sur la broche 3 d'une Arduino Micro déclenchant une interruption externe, registre EICRA configuré sur front descendant, LED de la broche 13 allumée depuis la routine d'interruption
- Récupérer un Micro bloqué : bootloader Caterina et rituel de l'upload avance Schéma : IMG-micro-avance-2-micro-recuperation-bootloader-caterina.svg — Séquence de récupération d'une Arduino Micro : double appui sur reset, fenêtre bootloader d'environ 8 secondes avec port USB 0x0037/0x8037, puis téléversement ou reprogrammation par ICSP
- Mode basse consommation : power-down et watchdog avance Schéma : IMG-micro-avance-3-micro-low-power-watchdog.svg — Arduino Micro en sommeil power-down : horloge 16 MHz coupée, seul le watchdog interne réveille le microcontrôleur toutes les secondes, LED témoin d'une brève activité au réveil
Code library — examples written for this board
clignotante.inoArduinobouton-led.inoArduinoclavier-auto-tape.inoArduinosouris-cercle.inoArduinotelecommande-media.inoArduinobouton-clic-souris.inoArduinopotentiometre-souris.inoArduinotelecommande-presentation.inoArduinosaisie-serie-vers-clavier.inoArduinobuzzer-melodie.inoArduino
Examples and repos found online
- arduino/ArduinoCore-avr github.com
- NicoHood/HID github.com
- MHeironimus/ArduinoJoystickLibrary github.com
- mcore1976/cc1101-tool github.com
- ryan-ma/PD_Micro github.com